Making a custom Garmin watch face
2022-10-06 | development
High-level view of the key steps #
- (Assumed as pre-requisite): Install Visual Studio Code
- (Assumed as pre-requisite): Have a Garmin account
- Installing the Garmin Connect SDK
- Installing the MonkeyC extension (Garmin SDK extension for project support, development and code analysis)
- Set up a new MonkeyC Watch face project
- Run the Garmin device simulator
- Create the digital time display
- Create a function to draw ‘gauges’
- Configure data gauges
- Compile the project
- Upload to Garmin Connect IQ store
- Download the watch face to your watch
The repository for this guide can be found here.
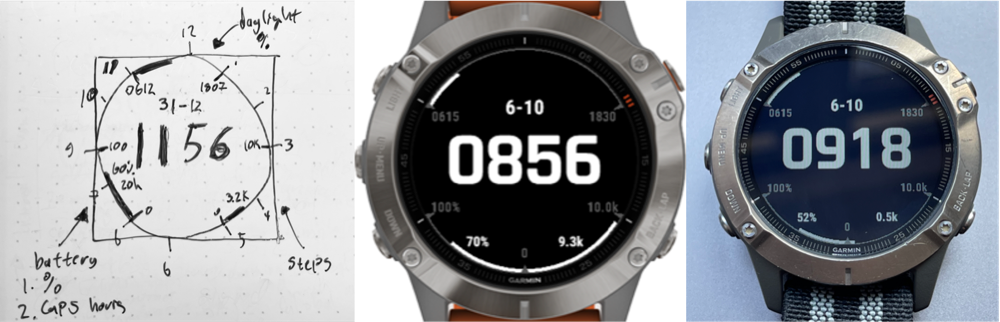
Design #
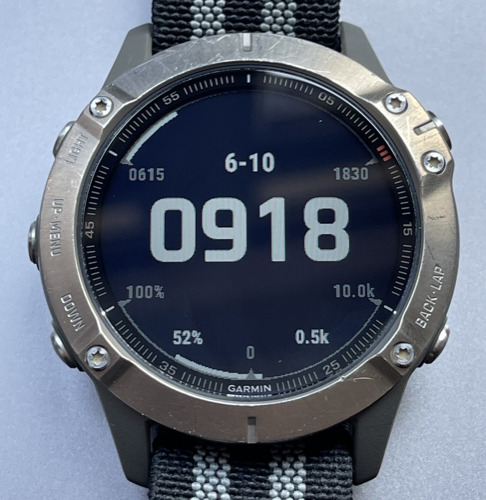
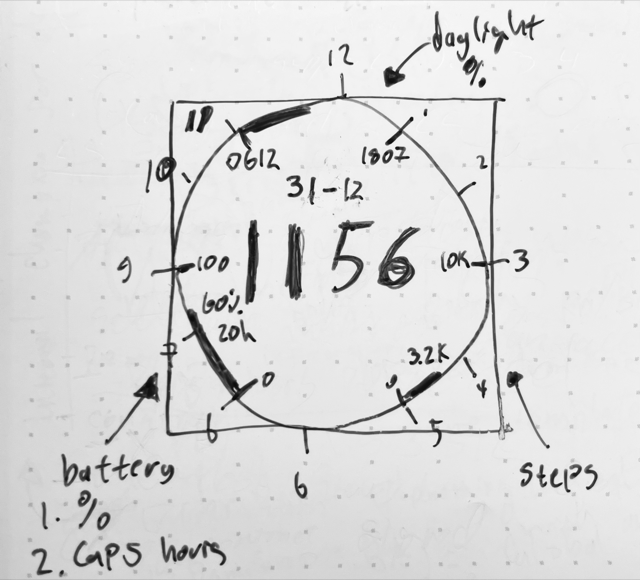
The design for this watch face is very simple and prioritizes legibility of a small number of key metrics that I care about:
- Current time: Digital 24-hour format, hours and minutes only, without separator for hours/minutes - e.g. 1527 for 3:27pm.
- Current date: Without year, in dd-mm format - e.g. 31-12 for 31st of December
- Battery: Overall battery %
- Steps: Show today’s steps versus a pre-defined (here hardcoded) target - e.g. 10k
- Sunrise/sunset: Sadly Garmin SDK does not provide these values for custom watch faces, so the values are hardcoded to 0615 and 1830.
Based on the above, I created a rough sketch of what to develop, shown below. I added the ‘hour’ indices to help with placement of the gauges, they will not be rendered as a part of the watch face.
Environment and SDK setup for development #
- Go to the Garmin SDK download page
- Follow the steps given on the page to download and install the SDK:
- Download the SDK manager
- Launch the downloaded SDK manager
- Complete first-time setup
- Within the SDK manager, download the latest Connect IQ SDK and choose the devices you want to develop for (e.g. Fenix 6)
- Once download finishes, click “Yes” when prompted to use the new SDK version as your active SDK
- Close the SDK manager
- Open your Visual Studio Code
- Follow the steps given on the SDK download page for installing the Visual Studio Code Monkey C Extension:
- Go to Extensions (
cmd + shift + Xon Mac) - Search for “Monkey C”, select the one from Garmin ( direct link)
- Install the extension
- Restart VSCode
- Go to command palette with
ctrl + shift + p(cmd + shift + pon mac) - Run “Verify installation” under Monkey C: Verify Installation
- Go to Extensions (
Starting a project #
- Open Visual Studio Code
- Open command palette with
ctrl + shift + p(cmd + shift + pon mac) - Type in “Monkey C: New project” and hit enter to start the create project wizard
- Choose a name for your project - here “mattermetrics”
- Choose a project type - “Watch face”
- Choose watch face type - “Simple with settings”
- Choose minimum supported API level - depends on what devices you want to build for, here we will go for 3.0.0 to support some older devices as well
- Hit enter, and you will be asked to choose a folder where to create the project. Note that the project will create it’s own folder, so if you choose
/Documents, your project will be created at/Documents/projectname/, depending on the project name that you chose.
After these steps, you should have a file structure resembling the below. The next section describes the project and code structure in further detail.
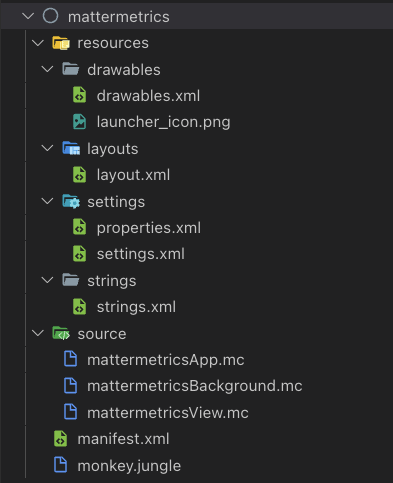
Code structure and what goes where #
Please note that I’ve written the below based on my experience - it is pragmatic and works, but may not be fully correct. If you are keen to go in-depth with the Connect IQ SDK, I recommend starting with Garmin’s resources: SDK basics, Core topics and FAQ.
The manifest.xml file contains high-level details about your application. While you can edit it directly, the VS Code extension makes this easy - type “Monkey c: edit” in the command palette to see which options can be edited, and use the relevant wizard to change an option.
resources - non-code assets and configuration files
#
The four subdirectories under resources contain non-code assets and configuration files for your watch face application. properties.xml, settings.xml and strings.xml together define the user-configurable options that you may want to implement - for example choosing between different date formats or choosing different data points for the watch face. properties.xml contains the default values, settings.xml describes the type of setting and options available to the user, and strings.xml maps settings options to machine-readable variable values.
By default, the template comes with three pre-defined settings:
- Background color: Color for watch face background, defaults to black
- Foreground color: Color for rendering time, defaults to red
- Use military time: True/false for whether to use this format, defaults to false
layouts can be used to define simpler and static elements of your watch face, for example drawing a bitmap logo or rendering time as text. This file will be updated later to customize how time and date is displayed.
The drawables directory contains your app’s launcher icon. This may be more relevant for other Connect IQ apps, but for watch faces I haven’t come across a need to change it.
source - your application code
#
The source directory contains the application code you will write. Creating a project as described earlier should result in three files being created in this directory:
projectnameView.mc: Details of the watch face - our code will go here!projectnameApp.mc: The high-level code for a watch face Connect IQ app - you don’t need to edit this at all.projectnameBackground.mc: Sets the background on which theViewis drawn - you don’t need to edit this at all.
Note that the naming of these files depends of the project name you chose earlier, so in my example these are mattermetricsApp.mc, mattermetricsView.mc, mattermetricsBackground.mc.
The projectnameView.mc file
#
This will be the most important file for our watch face code. The contents of the file are well explained by comments included as part of the template - abridged version of that file with just the main class and its key functions is shown below:
class mattermetricsView extends WatchUi.WatchFace {

    function initialize() {
        WatchFace.initialize();
    }

    // Load your resources here
    function onLayout(dc as Dc) as Void {}

    // Called when this View is brought to the foreground. Restore
    // the state of this View and prepare it to be shown. This includes
    // loading resources into memory.
    function onShow() as Void {}

    // Update the view
    function onUpdate(dc as Dc) as Void {}

    // Called when this View is removed from the screen. Save the
    // state of this View here. This includes freeing resources from
    // memory.
    function onHide() as Void {}

    // The user has just looked at their watch. Timers and animations may be started here.
    function onExitSleep() as Void {}

    // Terminate any active timers and prepare for slow updates.
    function onEnterSleep() as Void {}
}
Primarily we will work within the onUpdate function - you can assume this is run every minute to update the contents of the watch face.
The other functions, especially dealing with hide/show and entering/exiting sleep, become relevant for more complex watch faces and for further optimization of the power consumption of your code.
Best practices to consider before starting development #
Device aspect ratio and round vs. square watches #
Know what you are developing for and choose your build targets accordingly. The watch face in this guide is clearly specifically designed for a round watch face (with a 1:1 aspect ratio - i.e. a circle), and rendering the gauges for example would break on other types of screens. Note that Garmin also has some stranger devices with non-square aspect ratios, so if you plan on making your app available on every device, you should then correspondingly test it in the simulator for each aspect ratio and screen shape.
Scaling elements based on resolution #
Devices that have the same aspect ratio and screen shape may still have significantly different resolutions. For example, the screen resolution of the Fenix 7S is 240x240, while the resolution of the Venu is 390x390.
This means that when you define the position of an element on the screen, you should always define it in a relative way. If an element is drawn “10 pixels to the right, from the left edge of the screen”, the gap will look large on a Fenix but tiny on a Venu, so the proportions of your app are distorted. Similarly for the thickness of an element - a line 2 pixels in thickness will be decently legible on an older Fenix, but will look oddly small on a Venu. To preserve the proportions of your design, elements have to be both positioned and scaled depending on the resolution of the screen.
For scaling, in my watch faces I define a scaling variable based on the current device screen width vs. the value Fenix 6 I primarily develop for:
var scaler = dc.getWidth()/260.0;
// 1.0 for Fenix 6
// 390/260 = 1.5 for Venu etc.
Adding a target device and language to your project #
In order to run the simulator, your project needs to have a target product (=the specific Garmin device) it is intended for. You can set it in Visual Studio code as follows:
- Open command palette with
ctrl + shift + p(cmd + shift + pon mac) - Type “Monkey C: Edit products”
- Tick each product you want to support - for this example
Fenix 6 Pro / 6 Sapphire / 6 Pro Solar / 6 Pro Dual Power- If your device is not on this list, likely the API version requirement configured earlier was set too high. Use the “Monkey C: Edit Application” and decrease the API version number parameter.
- Open the command palette and execute “Monkey C: Edit languages”
- Choose at least one, for example English
This commit contains the initialization of the project and setting the target device.
Running the simulator for the first time #
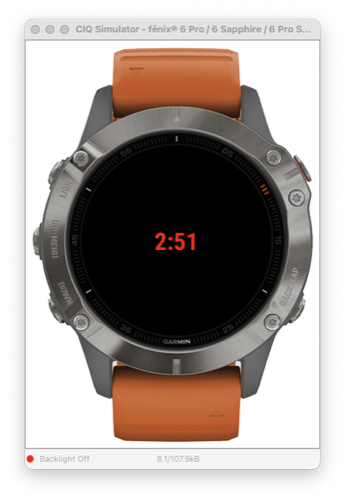
Without changing any of the code, open the projectnameView.mc and go to the “Run and Debug” section in VS Code or execute the command palette command “Debug: Start debugging” to launch the simulator. This will show your device with the default starting point watch face like below.
Which device is shown by default will depend on the products added to the manifest.xml.
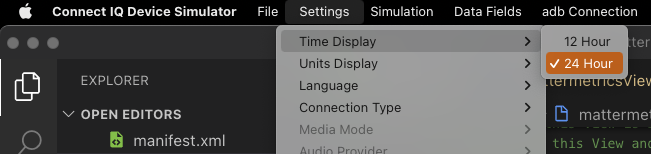
To change any of the device settings - such as preferred time format - choose the simulator window, use the Settings menu from the top bar as shown below.
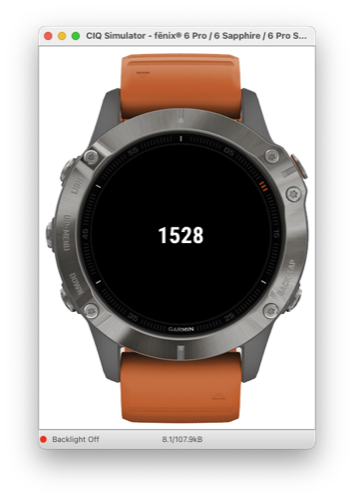
Rendering time in digital format #
The default watch face already renders time in digital format. Though the design calls for the time to be displayed in 24-hour format, the template code actually uses the user-defined device-level settings for time 12 vs. 24-hour time format, so we get this optional functionality out of the box.
First, as my focus is on military time, I changed the default value for the relevant setting (UseMilitaryFormat). I also changed the default value of ForegroundColor to white in
this commit. Later on I removed the background and foreground color setting customization options in
this commit.
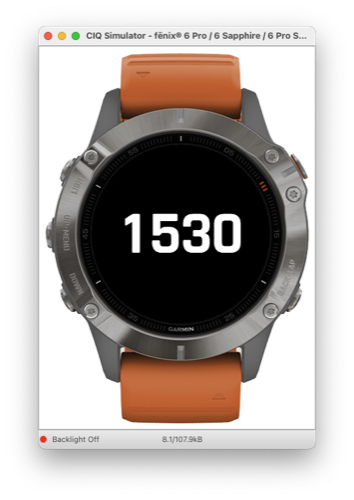
The size of the text is obviously too small - this is fixed by changing the font in resources/layouts/layout.xml in
this commit. The different constants describing fonts are listed
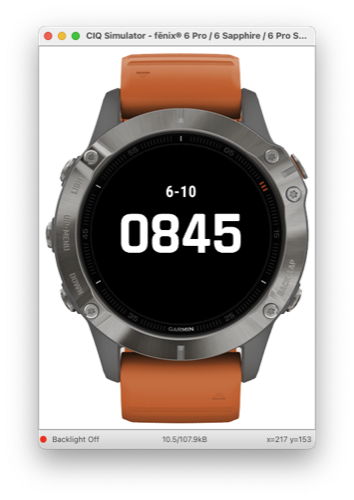
here in the SDK docs. In this case, I changed the font value to Graphics.FONT_SYSTEM_NUMBER_THAI_HOT. You can see the change displayed below.
Accessing data points and adding date #
To add in the date, we make changes in two places - first, add a layout line to layout.xml, and then add code to the onUpdate() function in projectnameView.mc.
The layout.xml file needs an additional label. The positioning is done in relative terms - x-coordinate is still centered, but the y-coordinate is set to 20% to position date above the time. A smaller font is also used.
<label id="DateLabel" x="center" y="20%" font="Graphics.FONT_TINY" justification="Graphics.TEXT_JUSTIFY_CENTER"/>
The code to update the date is simple, though note that the lines must be added before View.onUpdate(dc) is called. Additionally, a new import is added at the top: import Toybox.Time.Gregorian;. Formatting is done with
Lang.format(). The commit with this change can be found
here.
function onUpdate(dc as Dc) as Void {
    ... // Existing code to draw time is omitted

    // Get date info from the Toybox.Time.Gregorian package
    var info = Gregorian.info(Time.now(), Time.FORMAT_SHORT);

    // Format
    var dateString = Lang.format("$1$-$2$", [info.day, info.month]);

    // Find the drawable we added to our layout.xml
    var dateView = View.findDrawableById("DateLabel") as Text;

    // Set the label color, and text value
    dateView.setColor(getApp().getProperty("ForegroundColor") as Number);
    dateView.setText(dateString);

    // Call the parent onUpdate function to redraw the layout level
    View.onUpdate(dc);
}
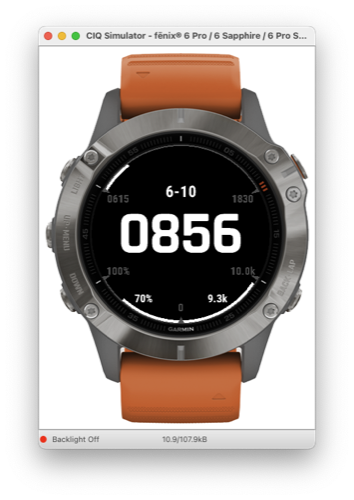
Creating data ‘gauges’ #
As per the design, the watch face needs to have three different gauge elements, each based on different data. Since the functionality required to draw a gauge can therefore be abstracted and reused, a function is defined that draws a gauge from given a set of inputs. Each gauge needs the following values as inputs:
Number:start_hour: hour index at which the gauge startsNumber:duration: ‘duration’ of the gauge in hours, determining its length on the dialNumber:direction: direction of gauge rotation 0=ccw, 1, cwFloat:start_val: minimum value of the gaugeFloat:end_val: maximum value of the gaugeFloat:cur_val: current value of the gaugeString:cur_label: text to display for current valueString:start_label: text to display at start of the gaugeString:end_label: text to display at end of the gauge
This function is called drawGauge() in the code, and calls a separate function drawHashMarksAndLabels() which in turn renders certain elements of the gauge. The actual implementation uses arrays instead of individual arguments, as the maximum number of function parameters is capped to 10 in MonkeyC.
The detailed development of this function - drawing 2D graphics and the mathematics around it - aren’t in the scope of this guide, but the code can be found in
this commit. If you are interested in learning more, the key functions used from the Garmin SDK graphics libraries are
drawArc(),
drawText() and
fillPolygon().
Compiling the project #
Note that you must have a developer key defined to do this. You can generate one with the extension by running “Monkey C: Generate Developer Key”.
- Open command palette with
ctrl + shift + p(cmd + shift + pon mac) - Type “Monkey C: Export project”
- Choose the export location to save the file to
Once finished, you will have a projectname.iq file, ready for upload to the Garmin store. If you would like to transfer the file to your watch directly instead, use the projectname.prg file.
Uploading to Garmin Connect IQ store #
- Navigate to the Garmin Developer Dashboard
- Sign in to your Garmin developer account if you have not yet done so
- Click “Upload an App”
- Choose the
projectname.iqfile exported in the previous step - Go through the process, upload app pictures where requested.
- If desired, tick the box to mark it as a beta application (to only allow yourself to download it later).
- Once complete, you will have to wait for approval - see the developer dashboard to check the status.
- Once the status changes to Approved, you can download the app. This may take up to 3 days.
Transferring a watch face to your watch (offline) #
- Connect your Garmin device in mass media transfer mode
- Copy your
projectname.prgfile to/GARMIN/APPSfolder - Disconnect your watch
- Edit your watch faces and choose your newly created custom watch face
Downloading the watch face to your watch #
Your app must be approved by Garmin before it can be downloaded. Once the approval process is complete, you can search for it on the ConnectIQ store and download to your device.
The watch face created during this guide, is available here.